Hook Installation:
1. Use belt hooks specifically designed for your round baler.
2. Square belt ends prior to installing hooks.
3. When lacing textured surface belts, always skive off (remove) textured surface where the hooks are to be installed.
4. Leave 1/4” on each edge of the belt unlaced. This guards against end hooks being torn out by the belt guides.
5. Always install one more hook on the leading end (pulling end) of the belt than on the trailing end (end being pulled).
6. Hooks are properly sized and clinched when:
- A. Hook legs are parallel.
- B. Hook points penetrate and fold on opposite side of the belt.
- C. 1/3 to 1/2 of wire diameter is embedded into belt.
- D. “Knuckles” of hook should not be higher than the legs when installed.
7. Never use a hammer to finish clinching hooks. This tears the belt fabric causing premature splice failure.
8. When lacing belts with a vise lacer, always use the pressure plate provided to finish clinching belt hooks.

Belt installation:
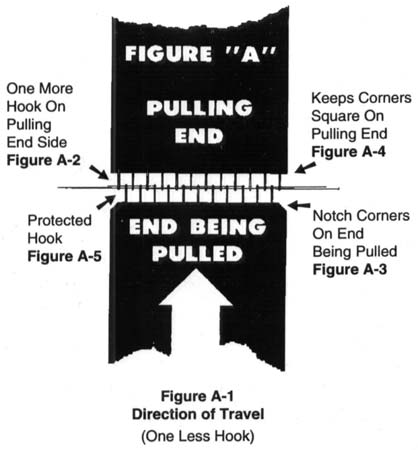
1. Install your baler belts according to the direction of travel (see Figure A-1).
2. The belt splice, not the belt, always determines direction of travel.
3. The diagram below shows a belt with a pulling (leading) end and an end being pulled (trailing end).

There is always one more hook on the pulling end splice than on the end being pulled (see Figure A-2). This protects the end hooks on the end being pulled from being picked off by the belt guides (see Figure A-5).
After installing hooks, notch the corners of the belt only on the end being pulled (see Figure A-3). This allows the belt guide to slide past the belt without causing damage to the belt or splice.
Never notch the belt corners on the pulling end (see Figure A-4). Square corners on the pulling end keeps the belt guides from sliding into the splice joint which can damage the belt and splice.
